Here is one idea that will let you utilize the Surbo system to the maximum. Attaching a boost gauge, you will be able to get the most power per throttle travel (->press less, get more power). It's not for measuring a boost output, but as a means of consistently commanding the Surbo, especially under low-torque situations at very low rpm and/or in a very high gear. If you do not wish to install a gauge, just reading this page will help you understand the Surbo system better. Note: "gauge" and "meter" refer to the same thing.
Why A Boost Gauge?
When you have your gauge installed and you drive normally, you will realize that it is always pointing up and down. This means that supply of air (from the air intake) is not equal to demand for air (by the engine), especially during acceleration, or after gearchanges, or driving under different loads or terrain, or a combination of the above. When the demand of air is not met by the air intake (indicated by a falling needle on the meter), this can seriously reduce engine power. With the meter attached to and reading from the air manifold (the holding area between the throttle and engine), once you balance the needle at any point by moving your right foot, supply=demand and the power will be maximized. By moving your foot, the Surbo is activated automatically!Background
The boost gauge had found a new use as a Surbo trigger on our test car. While we wanted our customers to have the same fun, problems resulted as customers could not choose or find suitable gauges or supervise the job as stated; almost always, based on user feedback and our own checks, unknown installers did poor jobs that caused leaks to the vacuum and resulted in Surbo failure as well. So we have to write a clear guide to prevent failure during installation, for you to use in supervising the job. You can't just leave it to the installers as they won't care about giving you a perfect seal.Note: 1. If after installing a Surbo and the customer has a boost (or vacuum) meter installed by a third party, there will be the risk of an air leak so the Surbo guarantees cannot be assured (till the fault is rectified by us).
2. If the customer already has a boost (or vacuum meter) before the Surbo installation, we will have to disconnect the air connection to the meter in order to rule out any leak from it, while the Surbo is installed. The meter air connection will be blown into, and if it is airtight it will be reconnected, but if it is not airtight the air connection will have to be redone separately.
Recommended model below by Autoguage: we use this. Avoid unsuitable, overpriced meters, unsafe (for reading while driving) mounting positions, poor workmanship and connections that leak (and which also defeat the Surbo system). Remember, there must be no leak on all connections and any leak will cause Surbo power to be lost.
You need: Boost Gauge and stand, full-length vacuum tube, pre-installation advice from us during Surbo installation (connecting from purge line using step-down connector to vacuum tube, plug at free end of vacuum tube)
If you DIY (do-it-yourself): run the free end of the vacuum tube past the firewall and into the cabin, and to the Boost Gauge in its stand (double-side-taped on the dashboard in front of steering wheel). Wiring for light at night for the gauge, no light required in the day (any vehicle electrician can help).
When Will I Need A Boost Gauge?
1. If you want the Surbo to work the hardest, and your engine the least during quick acceleration. The Surbo system by design requires a fairly-closed throttle as described in How It Works, so that there is an adequate back pressure P3 between the throttle and the Surbo to cause the air to exit the Surbo's pins as jets, forming a vortex. If the throttle is very closed, this back pressure is max but delivery to the engine across the throttle is not max (light throttle, medium power situation). If you want more power, press a little more, and the boost meter needle will go up. The boost meter helps you get as close as possible to the throttle opening for peak Surbo power (which we have observed at -8 InHg) thus extracting the most power out of the Surbo system. Beyond -8 InHg, such as -6 InHg, the Surbo's power will drop (because the throttle is too open and the back pressure to the Surbo is lessened). Above the -8 InHg point, the engine will be working more than the Surbo is, such as in cases of flooring the accelerator (if the Surbo has already taken the engine to red line on the rpm meter by half throttle, and if there is no rpm limiter, the accelerator can be floored to get the max rpm by using the remainder of the engine's vacuum).2. When you wish to accelerate smoothly. For example, at a steady -10 inch Hg reading, the relative air pressure in the manifold is constant. This means that supply of air through the throttle, from the filter, aided by the Surbo's variable suction (by moving the throttle slightly), equals demand for air (by the engine, which could even be changing revs rapidly during acceleration). Therefore the air filter is not holding back any air that is required by the engine (there will be no hesitation), with the help of the Surbo. This gives smooth acceleration.
Also, since the air pressure is constant, the fuel pressure is also constant. This prevents overfueling and wastages. This is because the signal to the fuel pressure regulator is exactly the same vacuum signal to the boost meter--both are connected to the same vacuum (see How It Works). This will mean a very constant air fuel ratio, and -8 inch Hg has been found to be a good spot during quick acceleration, in many different cars with Surbos, up to a powerful Suzuki Swift Gti.
3. When you wish to activate the Surbo from a low rpm, below the normal 3000 rpm max Surbo power recommendation, such as around 2000 rpm. With the boost gauge, you can just pump your accelerator slightly to -6 inch Hg, release a little to -8 inch Hg to back pressure the Surbo, and maintain the gauge at -8 inch Hg by pressing accordingly to get maximum torque from the system. This also means you do not have to rev too much.
4. When you wish to press the minimum and yet get adequate Surbo power. Such as when you are going uphill, overtaking, or carrying big loads. The boost gauge helps you extract the maximum torque per throttle travel for the situation.
5. When you wish to conserve fuel, by pressing just enough to work up the Surbo or keep the car going at a constant speed. You can ease off the throttle (letting the boost gauge reading drop step by step) thus lessening the fuel pressure, and that also raises the back pressure P3 making the Surbo spin air faster and suck air harder through the filter. This way, you will be running more on air instead of fuel. A Suzuki Swift owner got 10% fuel savings after he added the boost gauge.
5a. Latest result from a Kia Rio 1.3 (manual) owner: from 400 km per tank, he got 550km per tank with one Surbo. Then he added another Surbo and a Boost Gauge, and got 680km per tank. Normally the second Surbo does not add as much to the mileage as the first one, so the marginal improvement must have been due to the gauge.
6. When your engine is low on power and torque relative to load or weight, or when it is turning excessively large wheels.
One usage example: when cruising in 5th gear (at -18 inch Hg), just press a little and hold it there, watch the needle go up by itself (pressure buildup) to -8 inch Hg, and then activate with gentle pushes to maintain -8 inch Hg to surge. Alternatively, you can overtake this -8 mark, by pumping to -6 InHg, and then back off, letting the reading drop to -8, thus back-pressurizing the Surbo, and pump slightly to maintain it at -8 InHg for maximum Surbo power.
Note: the above tests have mainly been done on manual cars, and all the Surbos peaked at -8 Inch Hg. We observed on an automatic '05 1.6 Corolla Altis 2 distinct sweet spots:
1. -10 Inch Hg, which moved the car economically (lightest throttle feel) and yet there was a prolonged surge.
2. -5 Inch Hg, which gave the max Surbo sensitivity and even induced kickdown, indicating that this could be the most sporty point to use.
Testing on automatic cars to be continued.

If Choosing Your Own Meter And Installer
Please read this carefully and follow it 100%.Mechanical meters: these run on an air vacuum tube only, from the manifold to the display in the cabin. Avoid mechanical vacuum gauges as they have loose springs and are not very controllable, but choose from only Boost Meters, which have tight springs (sellers are going to tell you your car is not turbocharged, and you won't need a boost meter, but you know better already).
Take meters with units Inch Hg (mercury), as we have found the optimum point (lightest throttle, maximum Surbo power) to be -8 inch Hg (black arrow on above image) at any rpm in any gear. Also, please mount the boost gauge directly in front of you on the dash as you will be using it all the time, as a side-pillar mount is unsafe since it is not in the line of sight while driving. You will require a few seconds to get the Surbo on so keep it straight ahead.
Choose a meter not only with units InHg, but with many markings like the Autogauge meter shown, so that you can choose easily between points. If in other units or without fine markings, the meter may not be easily controlled.
Note: If you have a properly-connected vacuum meter already, you can use -4 InHg (manual car, as observed on a Honda Jazz), or -2 InHg (auto car, as observed on a Mitsubishi Lancer). Apparently, due to the loose spring, there are no other sweet spots.
What If My Boost Gauge Has Different Units?
If you haven't bought your boost gauge, please choose one with Inch Hg as it is easy to follow the -8 mark, and there are more markings so you can find other sweet spots. If you have already installed one with different units, such as this, the following table might be useful. e.g. 8 inch Hg=0.27 kg/sq. cm (bar). (However, the nearest mark is -0.3 bar, so you'll need to estimate -0.27 bar. You might wish to make your own marking but be careful of parallax error). Otherwise, you can just try other points and see if you like the kind of power available at those points, e.g., -0.2 bar or -0.3 bar. The trick is to keep it constant so that the air-fuel pressure ratio is near to constant. Note that it is also possible to operate the Inch Hg meter at other points, say -12 In Hg, as long as the reading is constant, and you feel you like the experience. -12 In Hg has been found to be very light on the throttle and gives adequate picking up power, though it is nowhere near as quick as -8 In Hg.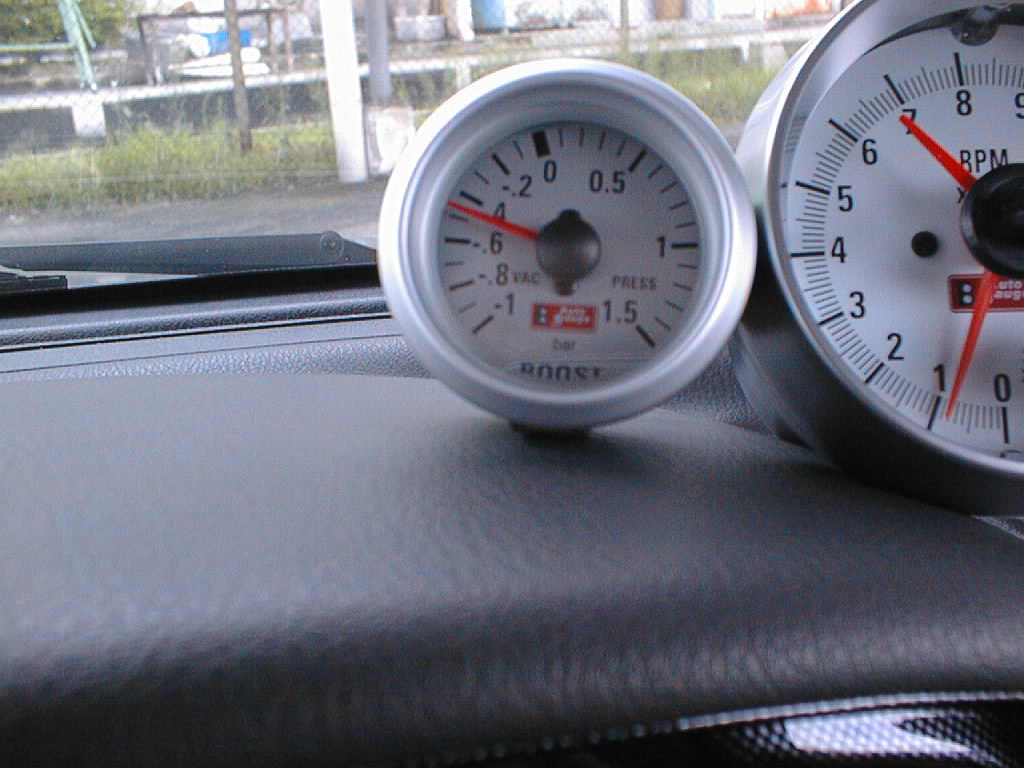
| First, type the number you wish converted here: Then, click radio buttons for desired conversion: | |||||||||
| Fm: | megadynes/ sq cm | kg/ sq cm | lb/ sq in | atmos- pheres | Hg* Meters | Hg* Inches | H2O* Meters | H20* Inches | H20* Feet |
| To: | megadynes/ sq cm | kg/ sq cm | lb/ sq in | atmos- pheres | Hg* Meters | Hg* Inches | H2O* Meters | H2O* Inches | H20* Feet |
| *Standard columns of Mercury at 0o C, g = 980.665 cm/sec/sec Standard columns of Water at 60o F, g = 32.1756 ft/sec/sec | |||||||||
Other Points To Note If You Have To DIY
The boost meter will be connected via an air tube to a tapping point on or near the manifold after the throttle (to avoid cutting any tube, you can join it to the manifold side of the purge line, which has been left plugged due to Surbo installation). As such, this air tube will be laid from the tapping point across the firewall (wall between the engine and the passenger compartment), and to the meter itself. If the air tube is a soft one, when it is connected to the tapping point and the male connector of the meter, there will be no leak (soft tube on hard connectors). Seal all joints anyway to be sure, even screw-threads. If, however, the air tube is hard to enable easy poking through the firewall, please introduce soft tubes to have a hard on soft on hard interface, which will not leak. Anything hard on hard (such as a hard tube inserted into a connecting hole (female type) in some types of meters) will cause a leak, and will ultimately affect the Surbo system and also the brake system as the brake pump needs a perfect vacuum. So choose a meter with a male connector (protruding one) for a good connection. Insist on silicone to seal ALL joints as no leak is allowed. Sometimes installers join several lengths of tube and all joints must be sealed (a hard air tube must be used as an interconnect between soft tubes; a soft tube tied over another soft tube will fail. Use glue if necessary). To avoid transmission of noise, after poking perpendicularly through a rubber seal in the firewall, use silicone to cover up any gap. Do not just lift the skirt of the seal and put the air tube through under it, as this will open up the way for noise.If you have to use the T joint provided in the boost meter pack, join tightly and seal carefully WITH GLUE as this is the area most likely to fail. Avoid cutting original tubes or tee-ing if you can--try to join the meter directly to any vacuum tapping point, or to the manifold side of the disused purge line. For sealing, you can also use pipe glue (used for joining pvc pipes) as it is stronger than silicone for small gaps.
Latest: Electronic Meters
This kind of meter is the easiest to install. The parts are:1. Transducer or sensor or sender (placed in the engine compartment), fitted with a short vacuum tube to the manifold of the engine (or to the manifold side of the deactivated purge line). All tube joints must be sealed with silicone or glue to prevent air leaks.
2. Meter (or display), which can be fitted on the top of the dashboard in front of the steering wheel.
3. Electrical wire, running from the Transducer, through the firewall, to the Meter. Any audio technician can run this wire so there is no risk of an air leak. This makes the extra cost of electronic meters worthwhile.
The electronic boost meter Autogauge 36000 SWL, though available only in bar, offers fine control with 20 markings, vs the 15 available on the pictured meter. If you can find it, go for the other boost meter model with InHg as units but it is rare.
No comments:
Post a Comment